This post is a behind-the-scenes look at a recent sculpting project — a full 3D portrait sculpted completely from scratch in Blender 4.5. No base mesh, no shortcuts, no voiceover. Just the process, captured as a timelapse.
The videos are available across the BraineyBites channels in different formats depending on how you like to watch. But before you hit play, here’s some context on what you’re actually looking at — the stages, the tools, and what was happening at each point of the sculpt.
What Kind of Video Is This?
To be clear upfront — these are silent process videos. There is no tutorial narration, no step-by-step explanation, and no talking through decisions. What you’re watching is a real sculpting session, captured as a timelapse, showing how a 3D portrait comes together from nothing. Although The Raw Video is Available on My Patreon.
If you’re the kind of person who finds process videos meditative, satisfying, or just genuinely interesting to watch — this is made for you. If you’re looking for a guided tutorial with instructions, this isn’t that. These videos are purely about showing the work.
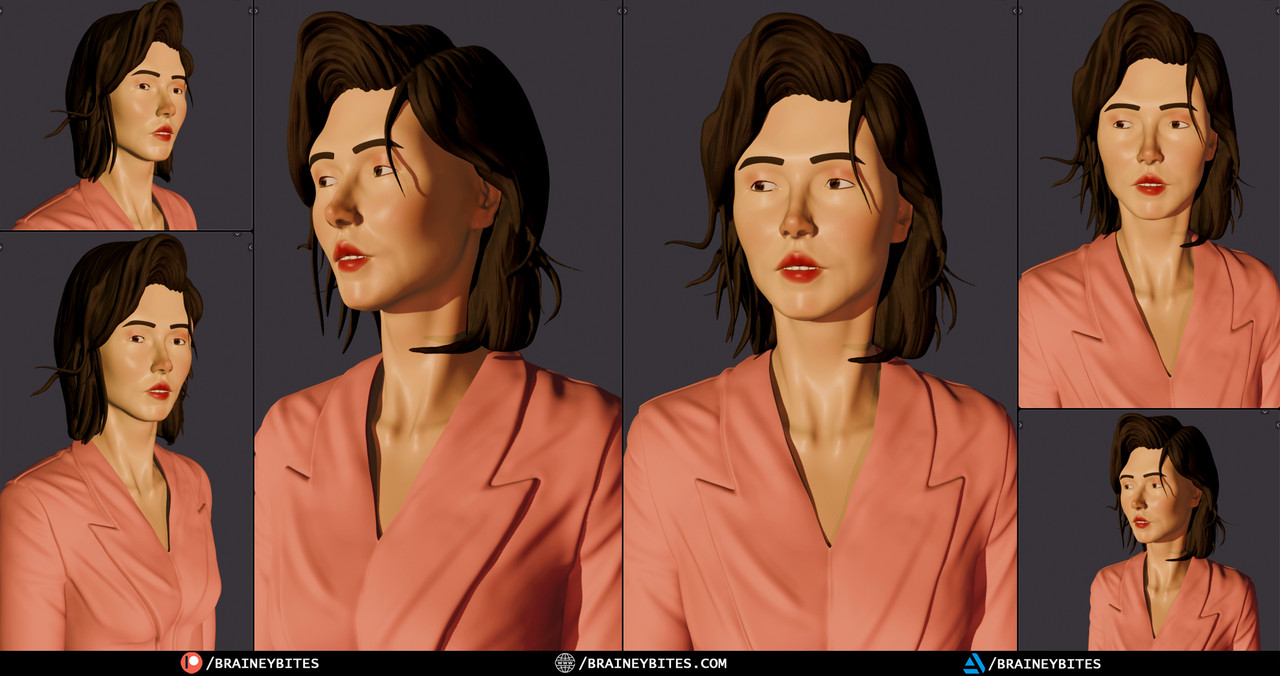
The Project — A 3D Portrait in Blender 4.5
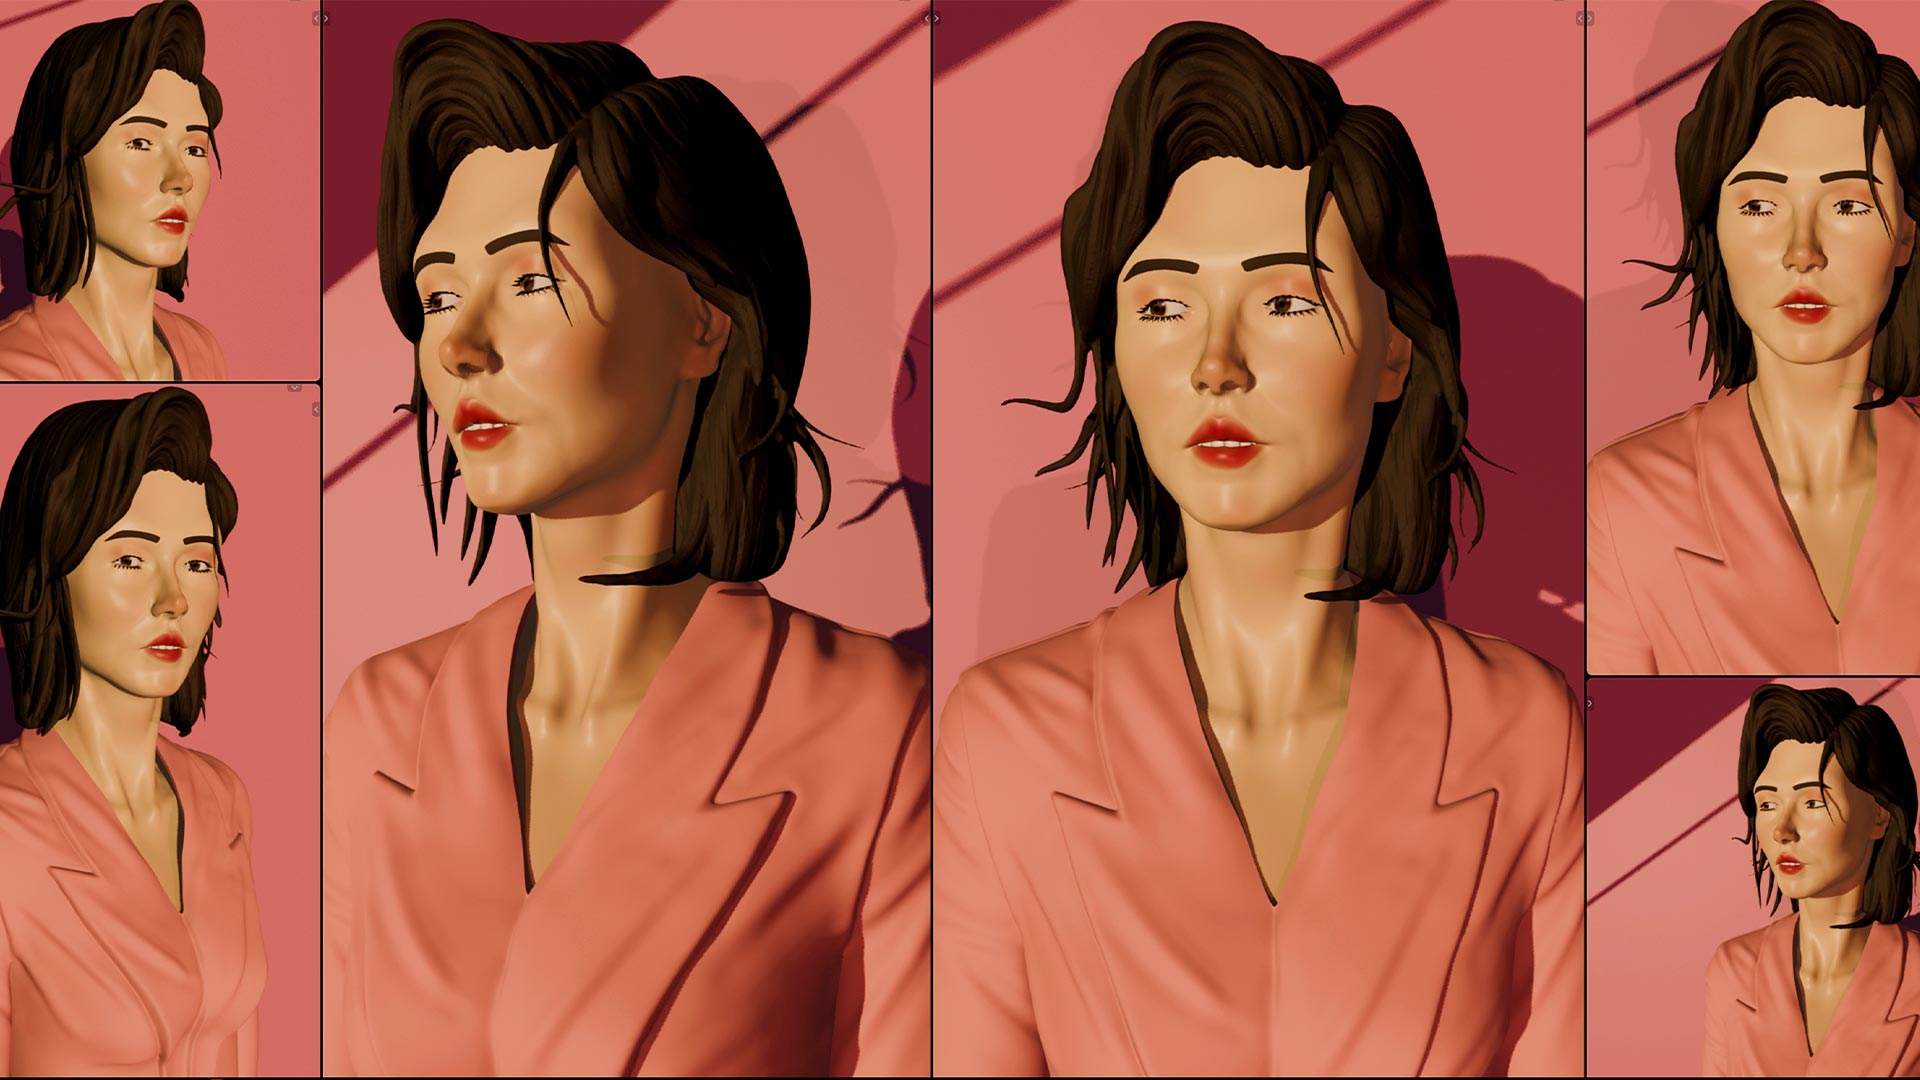
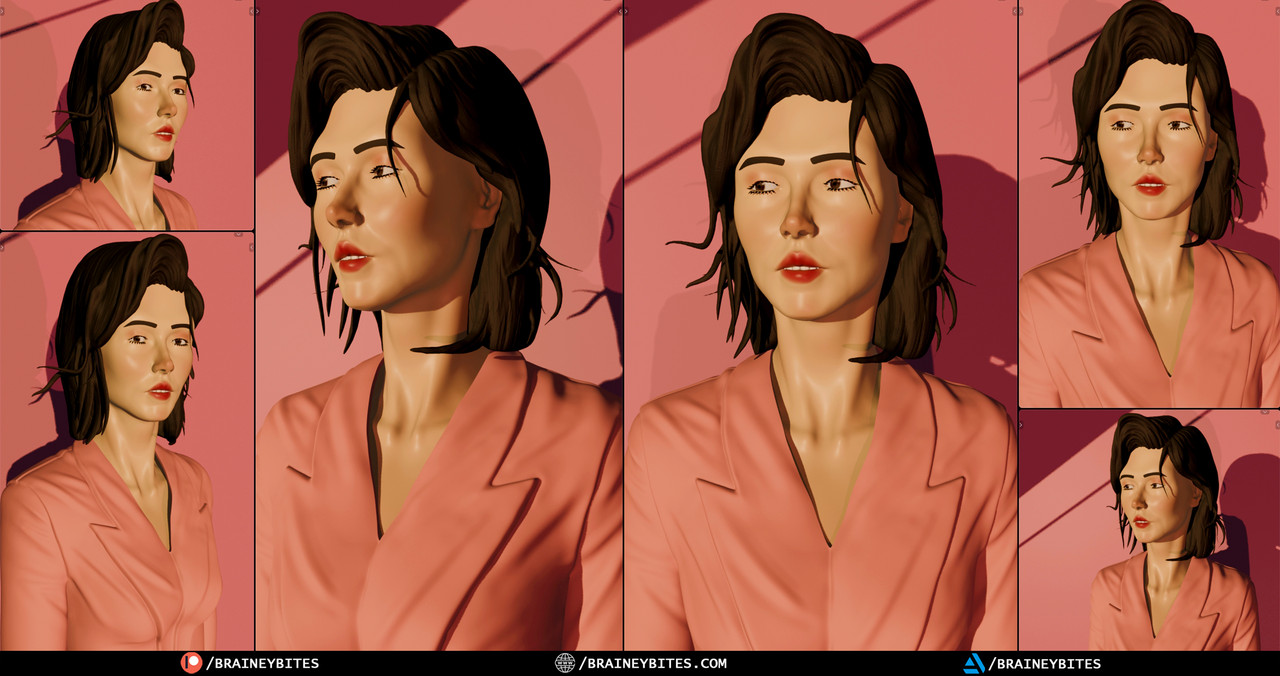
The subject is a female portrait, sculpted entirely in Blender 4.5 using the built-in sculpting toolset. The reference was a 2D photo. The goal was to recreate the likeness, lighting mood, and overall feel of the original image in full 3D.
Everything was built from a sphere — the face, the hair, the clothing folds. No pre-made assets, no downloaded base meshes. The final result was rendered in Cycles with a simple lighting setup that matched the warm, shadow-heavy tones of the reference.
A Look at the Process — Stage by Stage
Here’s a breakdown of what you’re seeing at each stage of the timelapse, so you can follow along even without narration.
Blocking the Head Shape
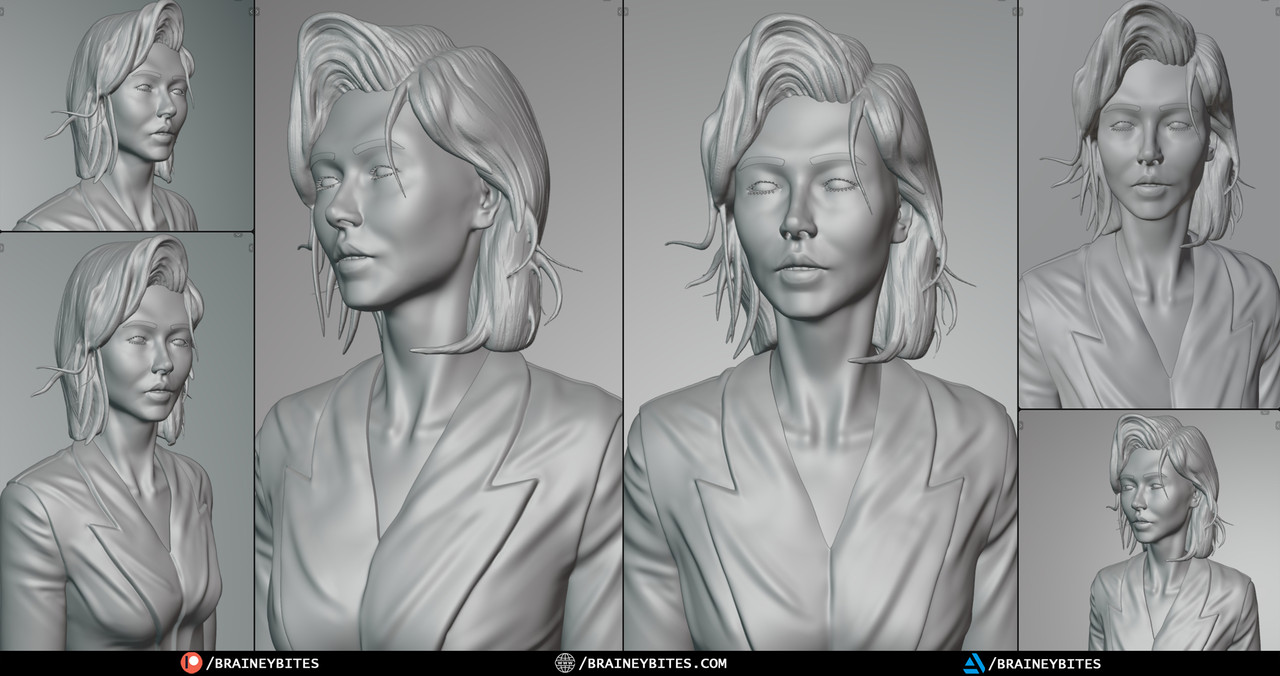
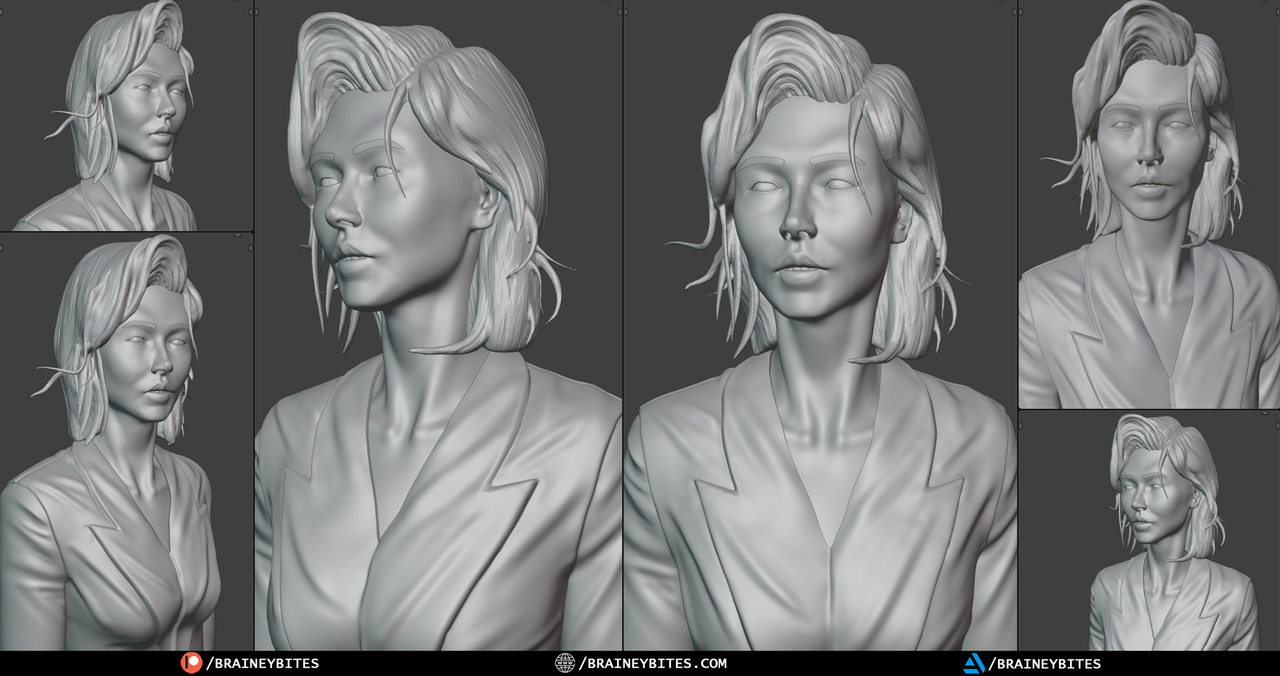
The earliest part of the timelapse shows the head being roughed out from a basic sphere. This is all large-form work — getting the general skull shape, the placement of the eye sockets, and the overall proportions of the face. Nothing is detailed at this point. The goal is just to get the silhouette right.
Building the Face
The longest section of the sculpt. This is where the actual face takes shape — brow ridge, cheekbones, nose, lips, jaw. You’ll see a lot of back and forth here, constantly refining proportions and checking them against the reference. This is what most of the sculpting time goes into.
Surface Detail
Once the big forms are locked, the work gets finer. Skin surface, subtle asymmetry, the small imperfections that stop a face from looking like a CG model. Blender’s multiresolution system makes it possible to add this level of detail without disrupting the underlying structure.
Hair
The hair is sculpted as solid forms — large flowing masses first, then individual strand groups layered on top. It’s one of the most visually satisfying parts of the timelapse to watch because of how quickly the character starts to feel complete once the hair goes in.
Final Render
The timelapse ends with the rendered result — lit in Cycles, matching the warm tones and shadow direction of the original 2D reference. The full render is what appears in the thumbnail.
Where to Watch — All Formats
The same sculpting session is available across four BraineyBites channels, each formatted differently so you can pick the version that fits how you watch:
- BraineyBites— 40-minute full timelapse. The complete session, every stage, compressed into a satisfying watch.
- BraineyBites— 10-minute short timelapse. The key moments trimmed down for a faster, tighter version of the same process.
- BraineyArchives — 3 hours 25 minutes, completely uncut. The raw, real-time full session. No edits, no speed-up. Every decision, every correction, in real time.
- BraineyPeeks— 5-minute sneak peek. A preview of the sculpt before the full videos dropped.
- BraineyShorts— 60-second clip. The most satisfying moment from the session, cut down for Shorts.
Pick whichever format suits you. The content is the same project — just experienced at different speeds and depths.
Some Videos on other channels are yet to be released (Depends on when you are reading this post).
Why Silent Timelapse?
There’s something about watching a skilled process unfold without commentary that a lot of people find genuinely calming. No narration means nothing pulling you out of the visual. You just watch the sculpture appear, stage by stage, stroke by stroke.
BraineyBites content is built around that experience. The work speaks for itself. These videos are for people who like to watch artists work — whether that’s to absorb the process passively, use it as background while they work on their own projects, or just because 3D sculpting looks cool.
That’s the intention. Not to teach, but to show.
About BraineyBites
BraineyBites is a 3D art and sculpting channel documenting real creative projects in Blender — no fluff, no filler. Process videos, timelapses, and archive sessions showing how 3D art actually gets made.
If you enjoy watching the work, subscribe to BraineyBites and follow the other channels for different formats of the same content. New projects are always in progress.